2018年1月24日星期三
Matlab Plot Functions(Matlab 画图函数)
All kinds of plot functions can be easily found in the reference link.
Good luck!

Reference:
https://cn.mathworks.com/help/matlab/creating_plots/types-of-matlab-plots.html
2018年1月23日星期二
关于灰度共生矩阵的理解
首先来介绍灰度共生矩阵的公式,这是最重要也是最基本的。

Fig.1 GLCM 计算公式

其中,W为滑动窗口的大小,Moving step为滑动窗口移动的距离,而d为共生距离,也就是灰度共生矩阵中的d,最后的K为量化后的灰度级别。

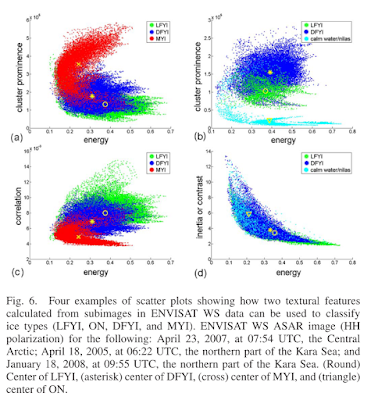
每一个窗口均获得一个GLCM,然后依据这些GLCM可以获得特征参数,然后即可获得如Fig.4 的散点关系图。
注意


Fig.1 GLCM 计算公式

Fig. 2 GLCM计算参数实验

Fig.3 滑动窗口的理解
Note: Fig.3 所示为水平方向(0度)获得共生矩阵的演示图。其他3个方向(45度、90度和135度)情况类似。
每一个窗口均获得一个GLCM,然后依据这些GLCM可以获得特征参数,然后即可获得如Fig.4 的散点关系图。

Fig.4 不同纹理特征的散点图
注意
需要注意的一点是,如果选定4个方向为GLCM的计算方向,那么在根据GLCM计算纹理特征时,需要首先根据4个方向的GLCM计算其纹理特征,然而将这4个方向的纹理特征取平均,获得最终的纹理特征计算结果[1]。
Reference:
2018年1月22日星期一
灰度共生矩阵
(先来补充)ENVI中关于灰度共生矩阵(又称为二阶矩阵,Second-Order Metrics)的介绍(另包含一阶矩阵的介绍):https://harrisgeospatial.com/docs/backgroundtexturemetrics.html
灰度共生矩阵(Gray Level Co-occurrence Matrix)是影像像元间角度以及距离二者的函数。该矩阵中的数值反应的是影像中某个像元与某一个方向与距离处指定像元像元值出现的次数。该算法可以很好的进行对影像进行纹理分析,来源是Haralick, Shanmugan, and Dinstein (1973)的文章。
灰度共生矩阵的运算举例说明:

灰度共生矩阵(Gray Level Co-occurrence Matrix)是影像像元间角度以及距离二者的函数。该矩阵中的数值反应的是影像中某个像元与某一个方向与距离处指定像元像元值出现的次数。该算法可以很好的进行对影像进行纹理分析,来源是Haralick, Shanmugan, and Dinstein (1973)的文章。
灰度共生矩阵的运算举例说明:
图1 数组实例
图1数组的像元数值范围为0-6,ENVI在计算的过程中,假定定义一个3×3的目标窗口,在上面的这步移动过程(X 方向右移1个像素,Y方向不移动)中,仅仅对于这个目标区域以及这一次的移动过程,可以获得以下共生矩阵:

以图2中(6,4)处的数值为2进行解释,即(x,y)相对于(x+1,y)像元为(6,4)出现的次数为2次,所以是2。同理,可以理解图2中其他数值的含义。
如果该3×3窗口继续移动,遍历整个图像,则灰度共生矩阵不单单是4×4的数组,应该是5×5的数组,这是因为原示例数组的数值范围为2-6,同时,灰度共生矩阵中的数值在窗口移动的过程中不断被改写,由于需要遍历整幅影像,因而该过程比较耗时。
参考网页链接:
https://harrisgeospatial.com/docs/backgroundtexturemetrics.html
Reference(参考文献):
Haralick, R., Shanmugan, K., and Dinstein, I. "Textural Features for Image Classification." IEEE Transactions on Systems, Man, and Cybernetics 3, no. 6 (1973): 610-621.
图2 灰度共生矩阵
以图2中(6,4)处的数值为2进行解释,即(x,y)相对于(x+1,y)像元为(6,4)出现的次数为2次,所以是2。同理,可以理解图2中其他数值的含义。
如果该3×3窗口继续移动,遍历整个图像,则灰度共生矩阵不单单是4×4的数组,应该是5×5的数组,这是因为原示例数组的数值范围为2-6,同时,灰度共生矩阵中的数值在窗口移动的过程中不断被改写,由于需要遍历整幅影像,因而该过程比较耗时。
参考网页链接:
https://harrisgeospatial.com/docs/backgroundtexturemetrics.html
Reference(参考文献):
Haralick, R., Shanmugan, K., and Dinstein, I. "Textural Features for Image Classification." IEEE Transactions on Systems, Man, and Cybernetics 3, no. 6 (1973): 610-621.
2018年1月20日星期六
2018年1月18日星期四
Python中__init__.py文件的作用详解
__init__.py 文件的作用是将文件夹变为一个Python模块,Python 中的每个模块的包中,都有__init__.py 文件。
通常__init__.py 文件为空,但是我们还可以为它增加其他的功能。我们在导入一个包时,实际上是导入了它的__init__.py文件。这样我们可以在__init__.py文件中批量导入我们所需要的模块,而不再需要一个一个的导入。
注意这里访问__init__.py文件中的引用文件,需要加上包名。
__init__.py中还有一个重要的变量,__all__, 它用来将模块全部导入。
这时就会把注册在__init__.py文件中__all__列表中的模块和包导入到当前文件中来。
可以了解到,__init__.py主要控制包的导入行为。要想清楚理解__init__.py文件的作用,还需要详细了解一下import语句引用机制:
可以被import语句导入的对象是以下类型:
•模块文件(.py文件)
•C或C++扩展(已编译为共享库或DLL文件)
•包(包含多个模块)
•内建模块(使用C编写并已链接到Python解释器中)
当导入模块时,解释器按照sys.path列表中的目录顺序来查找导入文件。
其中list第一个元素空字符串代表当前目录。
关于.pyc 文件 与 .pyo 文件
.py文件的汇编,只有在import语句执行时进行,当.py文件第一次被导入时,它会被汇编为字节代码,并将字节码写入同名的.pyc文件中。后来每次导入操作都会直接执行.pyc 文件(当.py文件的修改时间发生改变,这样会生成新的.pyc文件),在解释器使用-O选项时,将使用同名的.pyo文件,这个文件去掉了断言(assert)、断行号以及其他调试信息,体积更小,运行更快。(使用-OO选项,生成的.pyo文件会忽略文档信息)
导入模块
模块通常为单独的.py文件,可以用import直接引用,可以作为模块的文件类型有.py、.pyo、.pyc、.pyd、.so、.dll
在导入模块时,解释器做以下工作:
1.已导入模块的名称创建新的命名空间,通过该命名空间就可以访问导入模块的属性和方法。
2.在新创建的命名空间中执行源代码文件。
3.创建一个名为源代码文件的对象,该对象引用模块的名字空间,这样就可以通过这个对象访问模块中的函数及变量
import 语句可以在程序的任何位置使用,你可以在程序中多次导入同一个模块,但模块中的代码仅仅在该模块被首次导入时执行。后面的import语句只是简单的创建一个到模块名字空间的引用而已。
sys.modules字典中保存着所有被导入模块的模块名到模块对象的映射。
导入包
多个相关联的模块组成一个包,以便于维护和使用,同时能有限的避免命名空间的冲突。一般来说,包的结构可以是这样的:
有以下几种导入方式:
Reference:
http://www.jb51.net/article/92863.htm
2018年1月17日星期三
Sea Ice Chart of Canadian Ice Service Brief Introduction
The Canadian Ice Service (CIS) produces digital Arctic regional sea ice charts for marine navigation, climate research, and input to the Global Digital Sea Ice Data Bank (GDSIDB). The ice charts are created through the manual analysis of in situ, satellite, and aerial reconnaissance data. The ice charts have information on ice concentration, stage of development, and ice form, following World Meteorological Organization terminology. These sea ice charts begin in 2006 and cover the following regions of the Canadian Arctic: Northern Canadian waters (Western Arctic, Eastern Arctic, and Hudson Bay) and Southern Canadian waters (Great Lakes and East Coast). Each regional shapefile (.shp) (encoded in SIGRID-3 format) and associated metadata file (.xml) are combined into a tar archive file (.tar) for distribution. All data are available via FTP[1].
Fig.1 illustrates the basic components of the ice chart of CIS. The Introduction about SIGRID-3 is in reference [2].

Fig.1 CIS Sea Ice Charts
To validate the classification result of my sea ice and open water, and I want to reclassify the sea ice kinds based on SIGRID-3 format.Fig.2-Fig.3 gives my reclassify standard.


Fig.2 Code of Sea Ice Concentration

Fig.3 Code of Development Stage
[1] https://nsidc.org/data/g02171
[2]https://www.canada.ca/en/environment-climate-change/services/weather-manuals-documentation/manice-manual-of-ice/chapter-3.html#ex4a
[3]https://www.oceanbestpractices.net/bitstream/handle/11329/97/JCOMM%20TR23%20SIGRID3.pdf?sequence=1
[3]https://www.oceanbestpractices.net/bitstream/handle/11329/97/JCOMM%20TR23%20SIGRID3.pdf?sequence=1
2018年1月15日星期一
Batching Clipping using GDAL and ArcPy(批量裁剪:矢量裁剪栅格)
Using GDAL:
# -*- coding: utf-8 -*-
"""
Created on Mon Dec 18 22:53:22 2017
@author: Baikal
"""
import os
def CreatClipBatFile(batchfile):
batchcreat = open(batchfile,'w')
# 获得待裁剪影像的存储路径以及文件名
list_file = os.listdir(r'G:\MASIE\2016.06\Mosaic/')
file_count = 0
for filename in list_file:
if filename.endswith('.tif'):
file_path_name = filename
outname = filename[:-4] + '_Clip.tif'
file_count = file_count + 1
GDAL_Processing_CMD = 'gdalwarp -overwrite -q -cutline G:/2016.06.MOD/MOD02/5Clip/Clip_Image_Shp/Clip_Image.shp -tr 1000.0 1000.0 -of GTiff ' + \
' G:/MASIE/2016.06/Mosaic/' + file_path_name + ' G:/MASIE_3573/2016.06/Clip/' + outname + ' -crop_to_cutline\r\n'
batchcreat.write(GDAL_Processing_CMD)
batchcreat.close()
CreatClipBatFile(r'G:\MASIE_3573\2016.06\Batch_Clip_MASIE.bat')
Using ArcPy[1]:
# -*- coding: utf-8 -*-
"""
Created on Mon Jun 25 19:47:12 2018
@author: Baikal
"""
import arcpy
#from arcpy import env
def Clip_CIS( Raster_Shapefile_DIR, CIS_TIFF ):
shapefile = Raster_Shapefile_DIR + r'raster_domain.shp'
Clip_TIFF = Raster_Shapefile_DIR + r'64_15_03/CIS.tif'
rasterFormat = 'GTiff'
vectorFormat = 'ESRI Shapefile'
arcpy.Clip_management ( CIS_TIFF, in_template_dataset = shapefile,
out_raster = Clip_TIFF,
clipping_geometry = True )
CIS_DIR = r'G:\CIS_Sea_Ice_Chart_3573\2016/'
E_FILDER = 'EA_FMO_Segmentation'
W_FILDER = 'WA_FMO_Segmentation'
CIS_NAME = r'\cis_SGRDRWA_20160502T1800Z_pl_a_FMO_Segmentation.tif'
CIS_TIFF = CIS_DIR + W_FILDER + CIS_NAME
Raster_DIR = r'G:\201606Sen\scihub.copernicus.eu\201604/'
#待修改
S1_FOLDER = 'S1A_EW_GRDM_1SDH_20160429T140459_20160429T140559_011037_01099E_AFA2'
DIR = '\Composition/'
Raster_Shapefile_DIR = Raster_DIR + S1_FOLDER + DIR
Clip_CIS( Raster_Shapefile_DIR, CIS_TIFF )
Reference:
[1] https://gis.stackexchange.com/questions/139982/clipraster-with-three-inputs
Batching Mosaic Images using Arcpy(批量镶嵌:基于Arcpy)
# -*- coding: utf-8 -*-
"""
Created on Mon Jan 15 13:08:45 2018
@author: Baikal
"""
import arcpy, os
from os.path import join
files01_path = r"G:\MASIE\2016.06\r01/"
files08_path = r"G:\MASIE\2016.06\r08/"
files09_path = r"G:\MASIE\2016.06\r09/"
output_path = r"G:\MASIE\2016.06\Mosaic/"
list_file01 = os.listdir(files01_path)
list_file08 = os.listdir(files08_path)
list_file09 = os.listdir(files09_path)
file_count = 0
for filename in list_file01:
if filename.endswith('.tif'): file_count = file_count + 1
print '共有',file_count,'组影像待镶嵌'
for filename01 in list_file01:
if filename01.endswith('.tif'):
file01 = files01_path + filename01
SR = arcpy.Describe(file01).spatialReference
#print SR.Name
cellsizex = arcpy.GetRasterProperties_management(file01, "CELLSIZEX")
cellsize = cellsizex.getOutput(0) # assumes cells are equal in x and y size
filename08 = filename01[:12] + '8' + filename01[13:]
file08 = files08_path + filename08
filename09 = filename01[:12] + '9' + filename01[13:]
file09 = files09_path + filename09
input_file = file01 + ';' + file08 + ';' + file09
output_name = 'masie_' + filename01[18:25] + '.tif'
arcpy.CreateRasterDataset_management(output_path ,output_name ,cellsize ,"8_BIT_UNSIGNED", SR, "1")
output_file = os.path.join(output_path, output_name)
arcpy.Mosaic_management(input_file, output_file, "MINIMUM", "FIRST", "6.0", "6.0")
"""
Created on Mon Jan 15 13:08:45 2018
@author: Baikal
"""
import arcpy, os
from os.path import join
files01_path = r"G:\MASIE\2016.06\r01/"
files08_path = r"G:\MASIE\2016.06\r08/"
files09_path = r"G:\MASIE\2016.06\r09/"
output_path = r"G:\MASIE\2016.06\Mosaic/"
list_file01 = os.listdir(files01_path)
list_file08 = os.listdir(files08_path)
list_file09 = os.listdir(files09_path)
file_count = 0
for filename in list_file01:
if filename.endswith('.tif'): file_count = file_count + 1
print '共有',file_count,'组影像待镶嵌'
for filename01 in list_file01:
if filename01.endswith('.tif'):
file01 = files01_path + filename01
SR = arcpy.Describe(file01).spatialReference
#print SR.Name
cellsizex = arcpy.GetRasterProperties_management(file01, "CELLSIZEX")
cellsize = cellsizex.getOutput(0) # assumes cells are equal in x and y size
filename08 = filename01[:12] + '8' + filename01[13:]
file08 = files08_path + filename08
filename09 = filename01[:12] + '9' + filename01[13:]
file09 = files09_path + filename09
input_file = file01 + ';' + file08 + ';' + file09
output_name = 'masie_' + filename01[18:25] + '.tif'
arcpy.CreateRasterDataset_management(output_path ,output_name ,cellsize ,"8_BIT_UNSIGNED", SR, "1")
output_file = os.path.join(output_path, output_name)
arcpy.Mosaic_management(input_file, output_file, "MINIMUM", "FIRST", "6.0", "6.0")
2018年1月14日星期日
Create Random Points based on arcpy (批量生成随机点)
# -*- coding: utf-8 -*-
"""
Created on Sat Jan 13 20:49:27 2018
@author: Baikal
"""
# Import system modules
import arcpy, os
from arcpy import env
# First: To achieve dissolve the shapefile.
# Set local variables
inFeatures = r"G:\2016.06.MOD\MOD02\10Batch_2_Shp/"
list_file = os.listdir(inFeatures)
# Shapefile
file_count = 0
for filename in list_file:
if filename.endswith('.shp'): file_count = file_count + 1
print '共有',file_count,'个矢量文件产生随机点'
for filename in list_file:
inFeaturesName =inFeatures + filename
if filename.endswith('.shp'):
outFeatureClass = r"G:\2016.06.MOD\MOD02\10SHP_Dissolve/" + filename
outFeatureName = filename
dissolveFields = ["DN"]
# Execute Dissolve using LANDUSE and TAXCODE as Dissolve Fields
arcpy.Dissolve_management(inFeaturesName, outFeatureClass, dissolveFields, "",
"MULTI_PART")
# Second: To create several types of random points feature classes
#set environment settings
#env.overWriteOutput = True
# Create random points in an extent defined simply by numbers
out_path = r"G:\2016.06.MOD\MOD02\11Validation\test/"
outName = filename
fcExtent = outFeatureClass
numPoints = 200
numField = "DN"
minDistance = 6000
arcpy.CreateRandomPoints_management(out_path, outName, fcExtent, "" , numPoints, minDistance)
"""
Created on Sat Jan 13 20:49:27 2018
@author: Baikal
"""
# Import system modules
import arcpy, os
from arcpy import env
# First: To achieve dissolve the shapefile.
# Set local variables
inFeatures = r"G:\2016.06.MOD\MOD02\10Batch_2_Shp/"
list_file = os.listdir(inFeatures)
# Shapefile
file_count = 0
for filename in list_file:
if filename.endswith('.shp'): file_count = file_count + 1
print '共有',file_count,'个矢量文件产生随机点'
for filename in list_file:
inFeaturesName =inFeatures + filename
if filename.endswith('.shp'):
outFeatureClass = r"G:\2016.06.MOD\MOD02\10SHP_Dissolve/" + filename
outFeatureName = filename
dissolveFields = ["DN"]
# Execute Dissolve using LANDUSE and TAXCODE as Dissolve Fields
arcpy.Dissolve_management(inFeaturesName, outFeatureClass, dissolveFields, "",
"MULTI_PART")
# Second: To create several types of random points feature classes
#set environment settings
#env.overWriteOutput = True
# Create random points in an extent defined simply by numbers
out_path = r"G:\2016.06.MOD\MOD02\11Validation\test/"
outName = filename
fcExtent = outFeatureClass
numPoints = 200
numField = "DN"
minDistance = 6000
arcpy.CreateRandomPoints_management(out_path, outName, fcExtent, "" , numPoints, minDistance)
2018年1月13日星期六
arcpy 参数设置
arcpy函数参数设置时,未设置的参数利用 "" 替代。
例如:
CreateRandomPoints_management函数共有8个参数,未设置的参数也需进行标记。
arcpy.CreateRandomPoints_management(outGDB, outName, "", fcExtent, numPoints, "", "MULTIPOINT", numMP)
例如:
CreateRandomPoints_management函数共有8个参数,未设置的参数也需进行标记。
arcpy.CreateRandomPoints_management(outGDB, outName, "", fcExtent, numPoints, "", "MULTIPOINT", numMP)
CMD命令行只运行一条语句不能运行
问题:
今天在处理利用GDAL_Rasterize 将矢量数据转栅格时,本想利用bat批处理文件在CMD中进行批量处理,怎奈只能运行文件中的第一条命令,何解?
解决办法(Solution):
将bat文件打开,将其中全部的批处理语句复制,粘贴在OSGeo4W Shell中,则全部的批处理命令均可以正常运行。
今天在处理利用GDAL_Rasterize 将矢量数据转栅格时,本想利用bat批处理文件在CMD中进行批量处理,怎奈只能运行文件中的第一条命令,何解?
解决办法(Solution):
将bat文件打开,将其中全部的批处理语句复制,粘贴在OSGeo4W Shell中,则全部的批处理命令均可以正常运行。
2018年1月12日星期五
Batching Mosaic Images based on mask data and IDL(批量掩膜:基于IDL)
;+
; Author: Baikal
;-
; Time: Dec 15,2017
;
; To achieve the goal of batching Mask Land.
; Completed in Dec 19,2017 at 22:46.
;
Pro Batch_Mask_Land_02
directory = 'G:\2016.06.MOD\MOD02\5Clip\201606\'
files = file_search(directory,count = num,'*.tif')
Print,'共有',strtrim(num,2),'景影像待掩膜'
mask_file = 'G:\2016.06.MOD\MOD02\6Mask\Mask_01.tif'
mask_data = READ_TIFF(mask_file)
mask_data = reform(mask_data,[1, 1698, 1187])
for i = 0,num-1 DO BEGIN
MOD02 = READ_TIFF(files[i],GEOTIFF = geoinfo)
;将裁剪后的MOD02中存在的异常值转变为NaN值。
MOD02 = (MOD02 GT 0 AND MOD02 LE 1)*MOD02 + (MOD02 GT 1 OR MOD02 LE 0)*250
;修改DN=250为NaN b1*float(b1 ne 250)/(b1 ne 250)
MOD02 = MOD02*float(MOD02 ne 250)/(MOD02 ne 250)
Outpath = 'G:\2016.06.MOD\MOD02\7Sea\201606\'
pos = strpos(files[i],'\',/reverse_search)
Outname = strmid(files[i],pos+1,7) + '_Sea.tif'
;Multibands Layer Stacking
;通过[]实现多波段合成
Mask = [Mask_data,Mask_data,Mask_data,Mask_data,Mask_data,Mask_data,Mask_data]
Output_Data = MOD02 * Mask
WRITE_TIFF,Outpath + Outname,Output_Data,/FLOAT,GEOTIFF = geoinfo
Print,'第',strtrim(i+1,2),'景影像掩膜完毕'
endfor
Print,'掩膜完毕'
END
2018年1月11日星期四
Batching Mosaic Program (ENVI/IDL Secondary Development) (批量镶嵌:基于ENVI/IDL)
;+
; Author: Baikal
;-
; Time: Jan 11,2018
;
; Batching Mosaic based on ENVI/IDL.
PRO MOSAICbatch
COMPILE_OPT IDL2
; Start the application
e = ENVI()
; Select input scenes
files = FILE_SEARCH('G:\2016.06.MOD\MOD35\5Clip\', '*.tif')
Output_dir = 'G:\2016.06.MOD\MOD35\7Sea\201606\'
;将同一天待镶嵌的两幅影像移动至单独的文件夹
MV_dir = Output_dir + '\Single_Day_Double\'
scenes = !NULL
FOR i=0, N_ELEMENTS(files)-1 DO BEGIN
if i EQ 0 THEN void = READ_TIFF(files[i],GEOTIFF = geoinfo)
if i NE N_ELEMENTS(files)-1 THEN BEGIN
; FILE_MOVE,files[i],MV_dir
; FILE_MOVE,files[i+1],MV_dir
backslash_pos = strpos(files[i],'\',/reverse_search)
file_date1 = strmid(files[i],backslash_pos + 1,7)
file_date2 = strmid(files[i+1],backslash_pos + 1,7)
if file_date1 EQ file_Date2 THEN BEGIN
raster1 = e.OpenRaster(files[i])
raster2 = e.OpenRaster(files[i+1])
scenes = [raster1, raster2]
; Create the mosaic raster
mosaicRaster = ENVIMosaicRaster(scenes , BACKGROUND = !VALUES.F_NAN )
; Save it as ENVI format
newFile = e.GetTemporaryFilename()
mosaicRaster.Export, newFile, 'ENVI'
; Open the mosaic file
mosaicRaster = e.OpenRaster(newFile)
; Exportthe raster as a TIFF file.
; Change the directory as needed for your own system
SubRaster = ENVISubsetRaster(mosaicRaster)
; Display the result
View = e.GetView()
Layer = View.CreateLayer(mosaicRaster)
View.Zoom, /FULL_EXTENT
Outname = file_date1 + '_Cloud.tif'
SubRaster.Export, Output_dir + Outname , 'TIFF'
; Close the dataset and remove it from the display
raster1.Close
raster2.Close
endif
endif
ENDFOR
e.close
END
Reference:
http://www.harrisgeospatial.com/docs/ENVIMosaicRaster.html
http://www.harrisgeospatial.com/docs/programmingguideworkingwithrasters.html#VirtualRasterConsiderations
2018年1月8日星期一
GDAL_Rasterize(批量矢量转栅格)& GDAL_Polygonize(批量栅格转矢量)
GDAL_Rasterize矢量转栅格就一句代码的事儿,真不知道你们写那么多的Python代码干嘛。(当然,需要OSGeo4W Shell辅助罢了)
栅格转化为矢量的一个实例:
gdal_polygonize C:\Users\Baikal\Desktop\delete\2016182_1850_Ice_Water_Segmentation.tif G:\2016.06.MOD\MOD02\8Mask_Cloud_Shp\2016182_1850_Ice_Water_Segmentation.shp -f "ESRI Shapefile"
附:
矢量转化为栅格的一个实例:
矢量转化为栅格的一个实例:
gdal_rasterize -a CT -l cis_SGRDREA_20160104T1800Z_pl_a -a_nodata -2 -init -1 cis_SGRDREA_20160104T1800Z_pl_a.shp G:\CIS_Sea_Ice_Chart_3573\2016\EA_Raster/cis_SGRDREA_20160104T1800Z_pl_a_CT.tif
-tr 1000 1000 -ot Int16
-tr 1000 1000 -ot Int16
栅格转化为矢量的一个实例:
gdal_polygonize C:\Users\Baikal\Desktop\delete\2016182_1850_Ice_Water_Segmentation.tif G:\2016.06.MOD\MOD02\8Mask_Cloud_Shp\2016182_1850_Ice_Water_Segmentation.shp -f "ESRI Shapefile"
GDAL_Rasterize参数设置参考链接:
http://www.gdal.org/gdal_rasterize.html
GDAL_Polygonize参数设置参考链接(注:其中gdal_polygonize.py的'.py'可以省略):
http://www.gdal.org/gdal_polygonize.html
GDAL_Polygonize参数设置参考链接(注:其中gdal_polygonize.py的'.py'可以省略):
http://www.gdal.org/gdal_polygonize.html
2018年1月6日星期六
Batching Reprojection using Python (批量转投影:基于arcpy)
# Projection Convertion &&& Resample images to a higher resolution
# Time: Oct.16,2017
# encoding = UTF-8
import arcpy
from arcpy import env
import os
import datetime
# Change to Target Path
arcpy.env.workspace = r"G:\2016.06.MOD\MODIS_JPG\Unzip/"
out_path = arcpy.env.workspace + '/Resample_500m_ProjectionC/'
os.mkdir(out_path)
list_file = os.listdir(arcpy.env.workspace)
# 统计文件夹下的.tif格式的文件数目
file_count = 0
for filename in list_file:
if filename.endswith('.jpg'): file_count = file_count+1
print '共有',file_count,'景.tif影像待处理'
count = 0
start_time = datetime.datetime.now()
# 查找文件夹下的.tif格式的文件
for filename in list_file:
if filename.endswith('.jpg'):
start_single_time = datetime.datetime.now()
os.chdir(arcpy.env.workspace)
file_name = filename[:-4]
os.chdir(out_path)
file_Covname = out_path + file_name + '_Resample_ProjectionC.tif'
# 3573为 'WGS_1984_North_Pole_LAEA_Canada'投影方式的EPSG代号
arcpy.ProjectRaster_management(filename, file_Covname, "3573",\
"BILINEAR", "500")
end_single_time = datetime.datetime.now()
time = (end_single_time - start_single_time).seconds
print '第',count+1,'景影像重采样完毕,耗时',time,'s'
count = count + 1
if count == file_count : print '\n全部影像重采样完毕'
end_time = datetime.datetime.now()
time = (end_time - start_time).seconds
m = int(time)/60
s = int(time)%60
print '处理总耗时',m,'m',s,'s'
2018年1月3日星期三
MATLAB中的分类器
听说你们都在搞机器学习,2333~
参考链接:
http://www.cnblogs.com/guyj/p/3640199.html
http://www.pudn.com/Download/item/id/2734871.html
参考链接:
http://www.cnblogs.com/guyj/p/3640199.html
http://www.pudn.com/Download/item/id/2734871.html
2018年1月2日星期二
ArcMap无法正常打开(已解决)
问题描述:

问题出现原因:
Windows 系统更新时,显卡驱动更新导致ArcMap无法正常使用。
解决办法:
将最近更新的显卡驱动卸载即可解决。
突然某一天,ArcMap10.2无法正常打开(报错如Fig. 1所示),百思不得其解。后来发现,ArcGIS下除了Arc Catalog可以正常打开外,其他均无法正常打开(已经成功破解)。
在找到解决办法之前,重装ArcGIS不下10次,并且以为是ArcGIS版本的问题,下载ArcGIS10.3进行了安装,仍旧无效,最终在知道Arc Catalog可以正常打开后,修改搜索关键词,通过百度知道找到了解决办法。

Fig. 1
问题出现原因:
Windows 系统更新时,显卡驱动更新导致ArcMap无法正常使用。
解决办法:
将最近更新的显卡驱动卸载即可解决。
2018年1月1日星期一
订阅:
博文 (Atom)
-
 遥感中常用到的产品介绍,MODIS产品众多,其他产品此处不作介绍。 详情如图1所示。 Fig.1 另: 关于MODIS不同产品的介绍可参考链接(以MOD09为例): https://modis.gsfc.nasa.gov/data/datap...
 -
 AMSR卫星系列: AMSR搭载于JAXA ADEOS-II卫星上于2002年12月14日发射。该卫星太阳能电池板在2003年10月25日失效; AMSR-E搭载于NASA EOS Aqua卫星上于2002年5月4日发射升空,该传感器已于2011年10月4日停止工作; ...